Responsive Design
 Identity & Logo Design
 Organic SEO
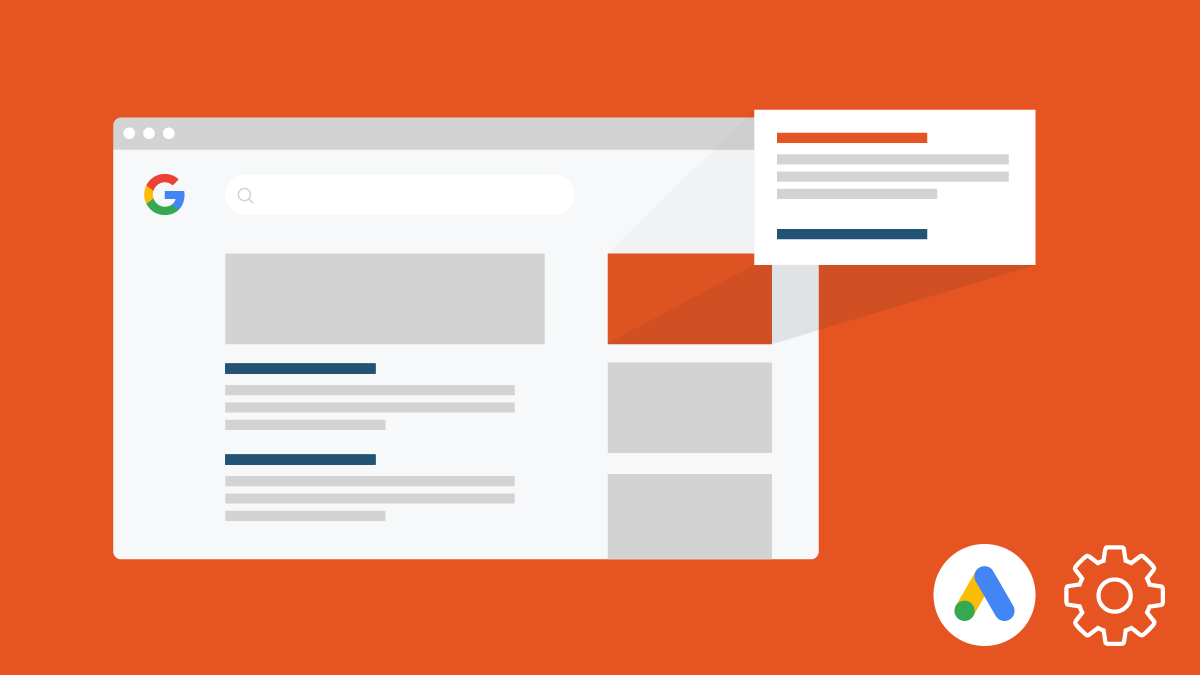
7 Ways To Lower Your Google Ads CPC & Save Money [2022 Update]
Google Ads paid search, or pay per click ads (PPC), can be a great way to drive traffic and sales for your website. It can also be expensive. Sometimes there’s no way round that. Thankfully, there are ways to lower your Google Ads CPC (cost per click), ensuring you bid only for the clicks that matter to you.
We’ve been running Google Ads campaigns—formerly Google Adwords—for years. Yes, we’ve seen the PPC world change a lot. We use these techniques and more all the time to save our clients thousands of pounds in irrelevant, wasted clicks.
Let’s get started!
Jump To:
- Network Settings
- Location Targeting
- Ad Schedule
- Bidding Strategies
- Ad Extensions
- Device Bidding
- Negative Keywords
1. Edit your Campaign Network settings to decrease CPC costs
When setting up your campaign, Google “helpfully” pre-enables a few Network options for you. These are “Include Google Search Partners” and “Include Google Display Network”. You can find these options in your Campaign view. Select the Campaign, then in the left-hand sidebar select Settings and expand the Network options.
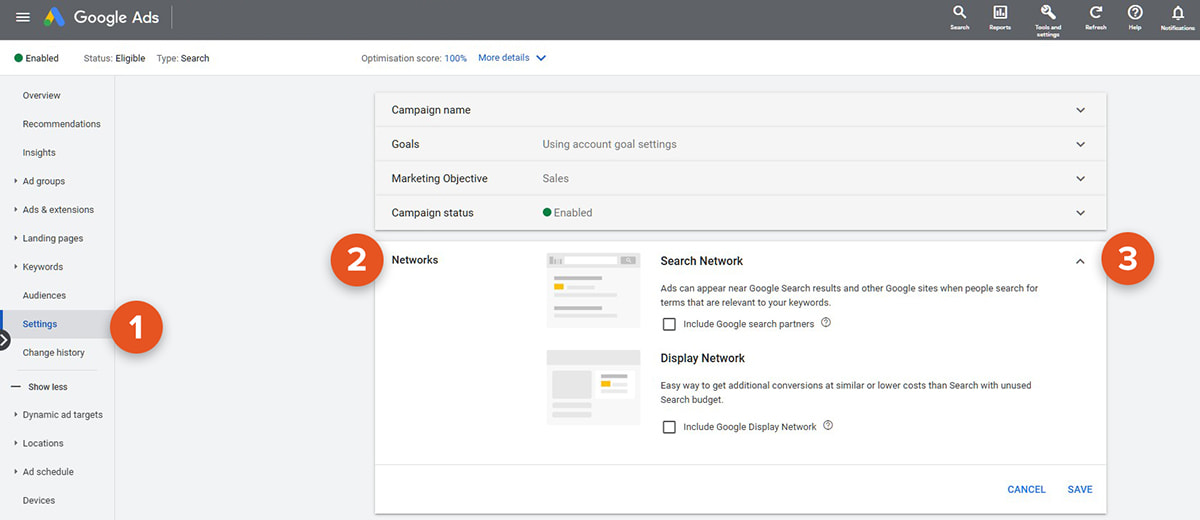
For a start, deselect Google Display Network.
What is the Google Display Network? It’s a collection of millions of websites, videos, and apps where your Google Ads can appear. The idea touted by Google is that:
“You can find the right audience with its targeting options that strategically show your message to potential customers at the right place and the right time.”
In other words, your Google Ad will show on Google SERPs (Search Engine Results Pages) as well as lots of other websites and apps.
In our experience, clicks from the Google Display Network are rarely profitable, and largely benefit only Google. After all, more places to show your ads means more ad clicks. And it’s the Ad Clicks that Google wants because that’s what they charge you for.
Search advertising is about showing the right ad at the point of a relevant search intention.
Displaying ads on websites where people are casually browsing is a different intention altogether. A completely different mindset.
We’ve found that clicks on Google SERPs are vastly more relevant and higher quality than clicks across the GDN.
Additionally, the Search Partner Network is a collection of search-related websites where your ads can also appear. When you advertise on the Google Search Network, your ad can show near search results when someone searches with terms related to one of your keywords.
The problem? On the Search Partner Network, you never know what sites your ad appears on. Google does not release this data. So, you cannot optimise your ads based on clicks from the Search Partner Network.
Also, we’ve found that people have more trust in a Google Search result, and less so when searching on other sites (even when they’re using Google Search within that site).
Have a limited budget? Exclude the Search Partner Network as well.
2. Optimise Location Targeting and lower your Google Ads CPC
If you’re a UK ecommerce brand, for example, shipping only within the UK, you may be tempted to set your Location Targeting to the entirety of the United Kingdom and leave it at that.
Unfortunately, this is like using a sledgehammer to crack a nut. We’ve got to be more efficient and targeted than this!
If your campaign has been running for a while, or you’re starting to get click data in, it’s possible to get more detail about where in the UK your clicks are happening. Furthermore, there are extra location targeting options you can choose to refine things further.
Here’s one way you can set up Location Targeting when creating a campaign.
Let’s take the UK as an example. Instead of setting your target location as the United Kingdom and moving on, add each UK County individually.
This way, you are still advertising to the whole of the UK, but you’ll start getting click and conversion data on a county-by-county basis. And you will find, for a variety of reasons, that some areas of the UK perform better for you than others.

Once you have enough click and conversion data, start making Bid Adjustments based on your desired KPIs. If you’re an ecommerce brand selling products online, take note of where the conversions are happening and how much it costs you, on average, to win those conversions. If you don’t have any conversion data early on, you can examine where in the UK your ad clicks are happening, how cost effective or expensive they are, and how the click-thru rates compare area-to-area.
If your campaign average CTR is 35% but the London area is showing a CTR of only 15% after 30+ ad clicks? Feel free to reduce the Bid Adjustment for that area. Conversely, somewhere else in the UK might have a higher-than-average CTR, and has already started converting. These could be profitable clicks, so you’ll want to bid more for people in that area.
It’s important to note that major cities are more expensive for clicks, but also have the most Search Volume.
If you’ve already been running a campaign for a while and want to now start refining your location targeting settings, you can still do that. Find those high-performing locations in the Geographic report, then go to the Targeted tab, select that location in all Campaigns to adjust bids accordingly.
3. Refine Ad Schedule to lower Google Ads CPC

When setting up your Campaign you can define an Ad Schedule for your ads. As a default, Google sets your ads to run 24/7, and this is a good start.
What’s better is breaking up the Ad Schedule into six blocks of 4-hour windows, like so:
- 0:00–4:00
- 4:00–8:00
- 8:00–12:00
- 12:00–16:00
- 16:00–20:00
- 20:00–0:00
When your ads start showing and receiving clicks, you’ll be able to view in the Campaign level your Ad Schedule. Find this in the left-hand sidebar, underneath Locations.
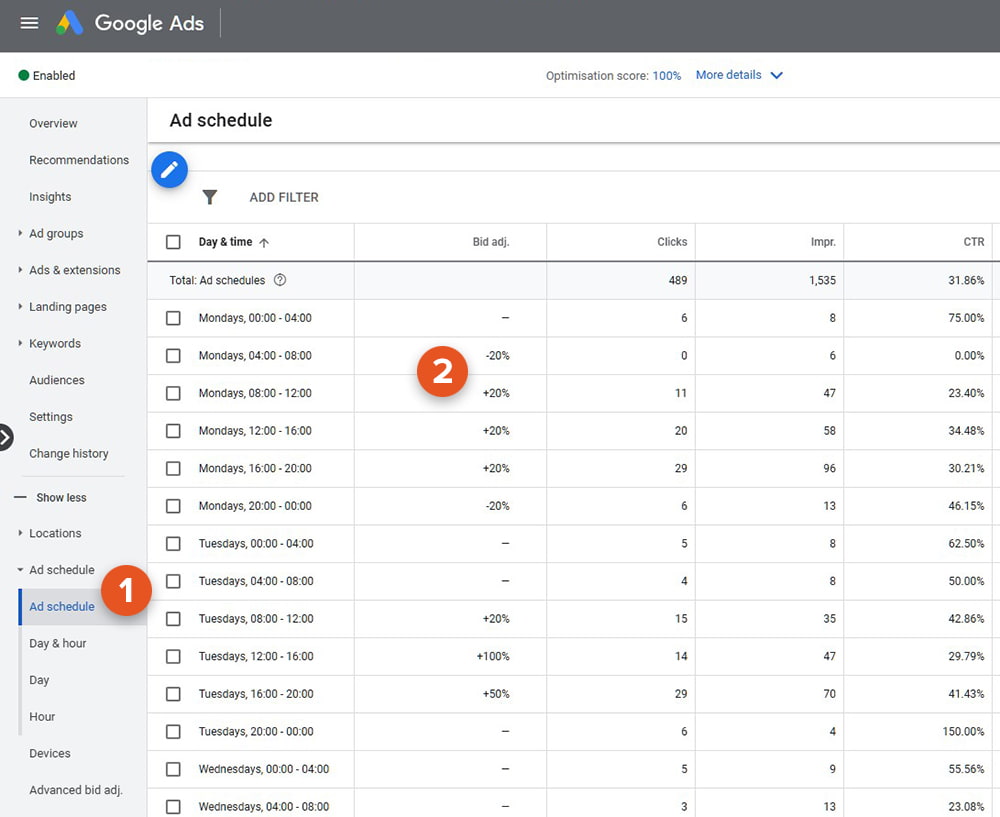
Here you can view your Ad Schedule and where your clicks, impressions etc. are happening within those 4-hour windows you set up.
Drill down further by checking out the Day & Hour report. This shows you on a day-by-day and hour-by-hour basis when your impressions, clicks, and conversions are happening. Export this data as a CSV, load it up in Excel or Google Sheets, and run a PivotTable on the data. You can generate a “heatmap” of when your most profitable clicks and conversions are happening.
Armed with this data, head back into your Campaign’s Ad Schedule view. You can then start making Bid Adjustments on the 4-hour windows that are performing well or badly based on your desired KPIs. If you don’t have an Ad Schedule set up, it’s easy enough to create one using the pencil editing icon. Then you can make Bid Adjustments on those days and times.
That way you can reduce Adwords costs by bidding more aggressively only on those time periods that perform best for you, and spend less on poor performing times.
It’s important, when setting up a Campaign, to allow your ads to run 24/7, even if you also break it down into manageable time chunks. The reason is that, when starting a campaign, you simply don’t know when the best and worst performing time and day periods are for you. You can, of course, make assumptions, but we think you’ll be surprised when the actual data starts rolling in.
You also might be thinking: why run ads in the middle of the night?
Well, if someone’s searching and clicking on ads at 1am in the morning, then that’s a strong search intent and you need to bid for it.
Like we said, you’ll be surprised when those profitable clicks and conversions happen.
4. Re-examine Bidding Strategies to improve CPC in Google Ads

A lot of people get caught out by this setting, especially when first setting up a Campaign.
When creating a Campaign, the guided process will walk you through Bidding Strategies. By and large, Google will auto-enable by default the Maximise Clicks bidding strategy. This is Google’s preferred option, but is horrendous for you.
The goal of this bidding strategy is to get as much traffic to your site as possible. It’s one of Google’s automated bidding strategies, and is definitely the one that will get you burning through your budget quickly. You set your daily budget and Google will automatically adjust your bids for ad clicks to ensure your ads get as many clicks for your budget as possible.
Remember what we said earlier about Google charging for the ad click?
With Maximise Clicks, you have no keyword control over those ad clicks you receive. They might be relevant clicks, interested in your product or service, but they also might not be. That’s not the focus of the strategy. The focus is volume of clicks, not relevancy of clicks. An efficient, optimised, and profitable Google Ads campaign gets the most relevant ad clicks for the lowest price possible.
For starting a new Campaign, or if you’re looking to lower your cost per click, select Manual CPC, and set a maximum CPC bid for each of your keywords. That way you can control the expenditure of your ad clicks and reduce high cost per clicks in Google Ads.
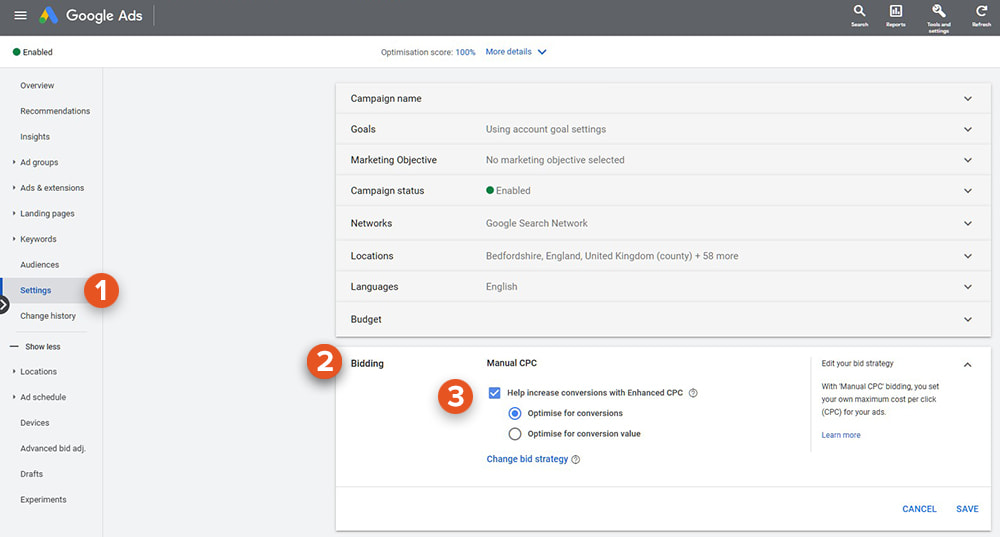
Once you start getting the data in, identify those Campaigns that are performing well and think about enabling the eCPC or Enhanced CPC option. This is a “semi-automated” bidding strategy. Essentially, your max CPC bid will still be respected, but if Google thinks an ad click is more likely to lead to a conversion, they will increase your bid to get that ad click.
The percentage increase used to be capped at +30%, but that was abolished in 2017. Now, with Enhanced CPC, Google can increase your max CPC bid as much as they want if they think an ad click will lead to a conversion. Thus, you have to keep an eye on those Avg. CPCs and make adjustments if they’re getting out of hand.
To move on from manual bidding, there are some automated bidding strategies you can look into, provided your Campaign has enough data. One of our favourites is Target CPA, that is, Target Cost per Acquisition. With this automated bidding strategy, you define the desired amount you’re willing to pay for a conversion, and Google will automatically adjust your ad bids to get the most amount of conversions possible for that target cost.
But like we said, you need to make sure you have sufficient data first before moving to this bidding strategy. Google advises 15 conversions in the last 30 days, but we think that’s a little low. Go for 1–2 conversions a day in the last 30 days. If your Campaign data demonstrates this, enable Target CPA and give Google Ads 2–4 weeks to readjust and optimise.
5. Enable Ad Extensions for better ads and lower Google Ads CPC
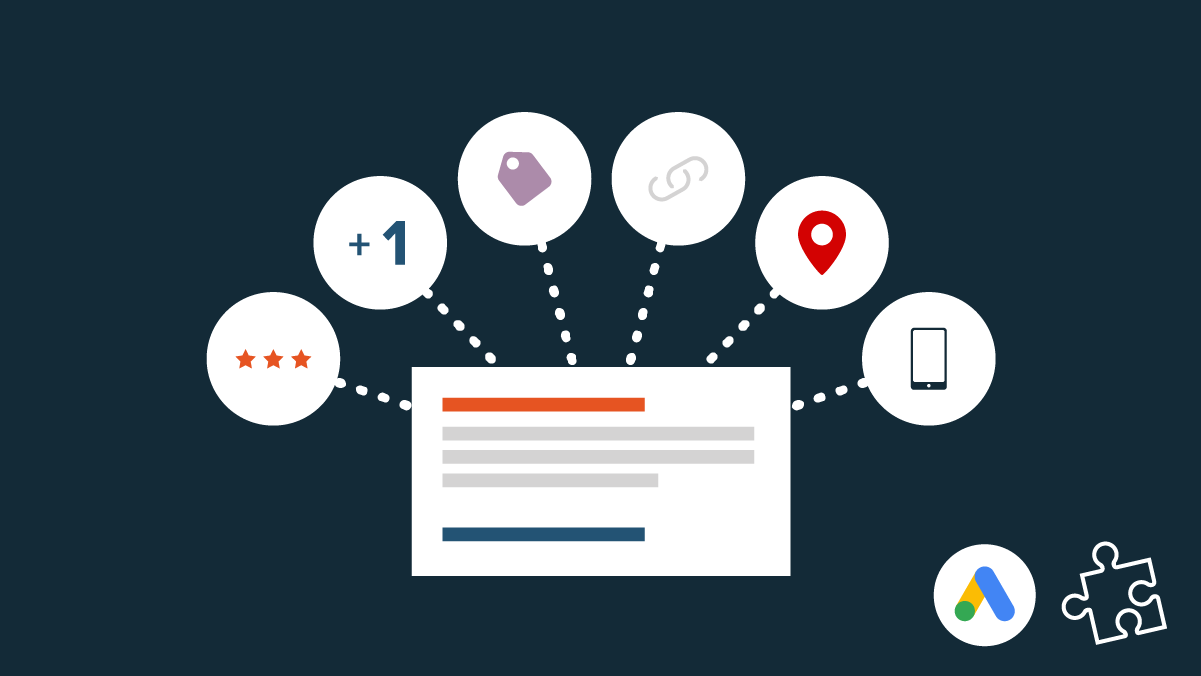
We advise utilising as many relevant Ad Extensions as possible. There’s a few good reasons:
1. You get more SERP real estate
Advertisers are competing for visibility of their ads at the top of a Google SERP. Give your ad the best chance by using all relevant Ad Extensions. These will increase the physical pixel size and visibility of your ad, increasing the chances of it getting noticed and clicked on.
2. They offer the user more options
Your ads should be useful and helpful to people. Extra sitelinks with relevant descriptions, quick call phone numbers, nearest location, review information, an idea of price ranges etc. all provide additional information to users and thus increase the chance of your ad getting clicked compared to your competitors.
3. They increase your Quality Score
Google hasn’t released the exact formula, but we do know from testing that Ad Extensions are a factor in how your Quality Score is calculated. How? Ad Extensions tend to increase the CTR (click-thru rate) of your ad (because of the first two reasons above). And an increased CTR means a better Quality Score, because it’s a signal that your ad is more relevant to people. This then will lower your Google Ads CPC.
As standard, your Campaigns should be using Sitelinks, Callouts, and Structured Snippets. Where relevant, also look into enabling Call Extensions, Location Extensions, and Price Extensions.
6. Adjust Device Bidding and improve CPC
An oft-overlooked area where you can make extra bid changes is in the Devices section. Find it in the left-hand side bar in Google Ads, underneath the Locations and Ad Schedule sections. You can make bid adjustments on devices on both the Campaign and Ad Group level.
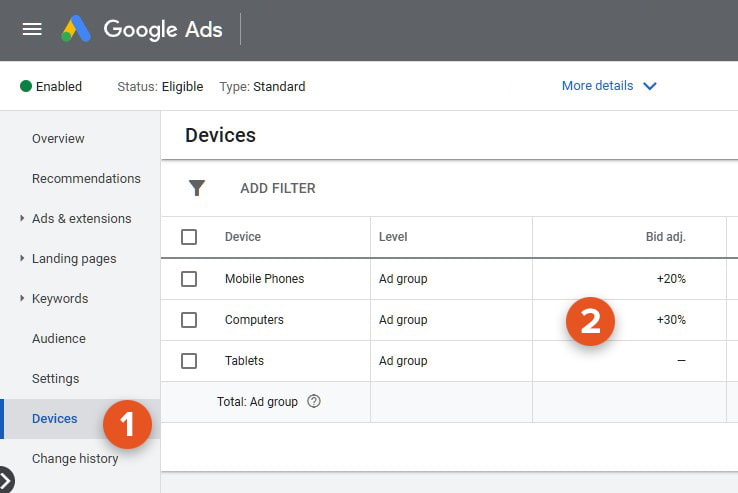
Here you can view Ad performance data based on what devices people are using when clicking on your Ads and interacting with your site.
In general, you’ll find Mobile Phones serve the most impressions and receive the most clicks. Then follows Computers, and then Tablets (you may, every now and then, also see a TV Screen device).
Review the ad data you’re receiving for your Campaign and/or Ad Group and measure it against your KPIs. If you’re getting lots of clicks on Mobile Phones, but they’re not converting as well as Computers, you can decide to bid more aggressively for those users on Computers compared to Mobile Phones. Why? Because you know users on Computers are more likely to convert.
Again, your data will vary, so you should always make Bid Adjustments based on the data you’re receiving against your business goals.
7. Define costly search terms as Negative Keywords to decrease CPC costs
Negative Keywords are crucial to any Google Ads Campaign you run. They define search terms that you don’t want your ad to show for.
Say for example you own a shop selling fashionable women’s boots. You might want to exclude words related to beauty, such as crème and lotion. That way you can avoid searches for the popular chemist chain, Boots. You could also exclude words like hiking, combat, or wellington to stop yourself showing for the wrong types of boots.
Similarly if you’re offering aerobics classes online, available per-episode or for a subscription, you’ll need to add “free” as a Negative Keyword, to stop your ads showing for people searching for free online aerobics online. They might like your ad and click it, finding it relevant, but ultimately they aren’t likely to convert.
Negative Keywords filter your ads to show only for the most relevant and cost-effective keywords. As you increase your ad relevancy for your target keywords by adding Negative Keywords, users clicking on your ads will find your offering more relevant to their searches, are less likely to bounce away from your site, thus increasing your ad’s Quality Score, and lowering your Google Ads CPC.
To find what Search Terms people are entering:
- Head to your Ad Group inside the Campaign
- Select on the left-hand sidebar Keywords
- When the Keywords option expands, you can view the Search Terms report
- Export the data as a CSV, view it in your spreadsheet editor, and identify search terms that are either irrelevant or those that are too costly
- You can then head to the Negative Keywords section under Keywords, and add those identified Search Terms as Negative Keywords.
Be careful of the keyword match type you use for entering Negative Keywords. Entering a Negative Keyword such as free online aerobics classes counts as a Broad Match Type, so your ad will stop showing for any of those words in any order, which will include your own targeted keyword! Surrounding the term in square brackets such as [free online aerobics classes] utilises the Exact Match Type and will stop your ad showing for that specific phrasing of words.
Getting help so you can lower Google Ads CPC
Hopefully these tips and tricks have helped you learn some new ideas for reducing your Google Ads costs and increasing the profitability of your campaigns.
Managing a growing Google Ads account, and scaling with profitability, can be time-consuming and intensive. Contact us now to see how we can help your business run cost-effective Google Ads campaigns.